Hallo zusammen,
ich habe vor kurzem ein Ugreen DXP480T Plus erworben und proxmox installiert, nach der Installation hat mich die blinkende Front LED genervt. Bei der Suche nach einer Lösung bin ich auf einen github Beitrag gestoßen der mir geholfen hat. Anbei für euch die todos als Zusammenfassung:
- Beim Start: Die LED blinkt weiß und bleibt anschließend dauerhaft weiß.
- Beim Herunterfahren: Die LED blinkt rot und bleibt anschließend dauerhaft rot.
-
i2c-tools installieren:
sudo apt install i2c-tools -
LED-Scripts erstellen
Startup Script:nano /usr/local/bin/startup-led.sh#!/bin/bash i2cset -y 0 0x26 0xa0 1 b # red off i2cset -y 0 0x26 0xa0 2 b # white off i2cset -y 0 0x26 0x51 0 b # Slow Flash off i2cset -y 0 0x26 0x50 0 b # Permanently on i2cset -y 0 0x26 0xb1 2 b # white on i2cset -y 0 0x26 0x50 1 b # Fast Flash on sleep 10 i2cset -y 0 0x26 0xa0 1 b # red off i2cset -y 0 0x26 0xa0 2 b # white off i2cset -y 0 0x26 0x51 0 b # Slow Flash off i2cset -y 0 0x26 0xb1 2 b # white on i2cset -y 0 0x26 0x50 0 b # Permanently on sleep 1 i2cset -y 0 0x26 0xa0 1 b # red off i2cset -y 0 0x26 0xa0 2 b # white off i2cset -y 0 0x26 0x51 0 b # Slow Flash off i2cset -y 0 0x26 0xb1 2 b # white on i2cset -y 0 0x26 0x50 0 b # Permanently onShutdown Script:
nano /usr/local/bin/shutdown-led.sh#!/bin/bash i2cset -y 0 0x26 0xa0 1 b # red off i2cset -y 0 0x26 0xa0 2 b # white off i2cset -y 0 0x26 0x51 0 b # Slow Flash off i2cset -y 0 0x26 0x50 0 b # Permanently on i2cset -y 0 0x26 0xb1 2 b # white on i2cset -y 0 0x26 0x50 1 b # Fast Flash on sleep 10 i2cset -y 0 0x26 0xa0 1 b # red off i2cset -y 0 0x26 0xa0 2 b # white off i2cset -y 0 0x26 0x51 0 b # Slow Flash off i2cset -y 0 0x26 0xb1 2 b # white on i2cset -y 0 0x26 0x50 0 b # Permanently on sleep 1 i2cset -y 0 0x26 0xa0 1 b # red off i2cset -y 0 0x26 0xa0 2 b # white off i2cset -y 0 0x26 0x51 0 b # Slow Flash off i2cset -y 0 0x26 0xb1 2 b # white on i2cset -y 0 0x26 0x50 0 b # Permanently on -
Scripte ausführbar machen
chmod +x /usr/local/bin/startup-led.sh chmod +x /usr/local/bin/shutdown-led.sh -
Systemd Service erstellen
Startup Service:
nano /etc/systemd/system/startup-led.service[Unit] Description=Startup LED Script After=multi-user.target [Service] Type=oneshot ExecStart=/usr/local/bin/startup-led.sh [Install] WantedBy=multi-user.targetShutdown Service:
nano /etc/systemd/system/shutdown-led.service[Unit] Description=Shutdown LED Script DefaultDependencies=no Before=shutdown.target reboot.target halt.target [Service] Type=oneshot ExecStart=/usr/local/bin/shutdown-led.sh [Install] WantedBy=halt.target reboot.target shutdown.target- Aktivieren und Neustart der Services
systemctl daemon-reload systemctl enable startup-led.service systemctl enable shutdown-led.service- Manuell testen
/usr/local/bin/startup-led.sh
/usr/local/bin/shutdown-led.sh
p.s.
Mit lsmod | grep i2c kann man zum i2c des Systems auflisten
sieht bei mir dann so aus:
i2c_algo_bit           16384  2 xe,i915
i2c_i801               36864  0
i2c_mux                12288  1 i2c_i801
i2c_smbus              20480  1 i2c_i801
und mit i2cdetect -y 0 kann man nochmal prüfen (nur für die, die sich auskennen). Bei dem Ein oder Anderen Modell von Ugreen kann es notwendig sein das Script anzupassen. Dann funktioniert im Script sehr wahrscheinlich i2cset -y 1 usw…
Für detect wäre es
i2cdetect -y 0
und die Ausgabe:
0  1  2  3  4  5  6  7  8  9  a  b  c  d  e  f
00:                         08 – – – – – – –
10: – – – – – – – – – – – – – – – –
20: – – – – – – 26 – – – – – – – – –
30: – – – – – – – – – – – – – – – –
40: – – – – 44 – – – 48 – 4a – – – – –
50: 50 – 52 – – – – – – – – – – – – –
60: – – – – – – – – – – – – – – – –
70: – – – – – – – –
Zu meiner Ausstattung:
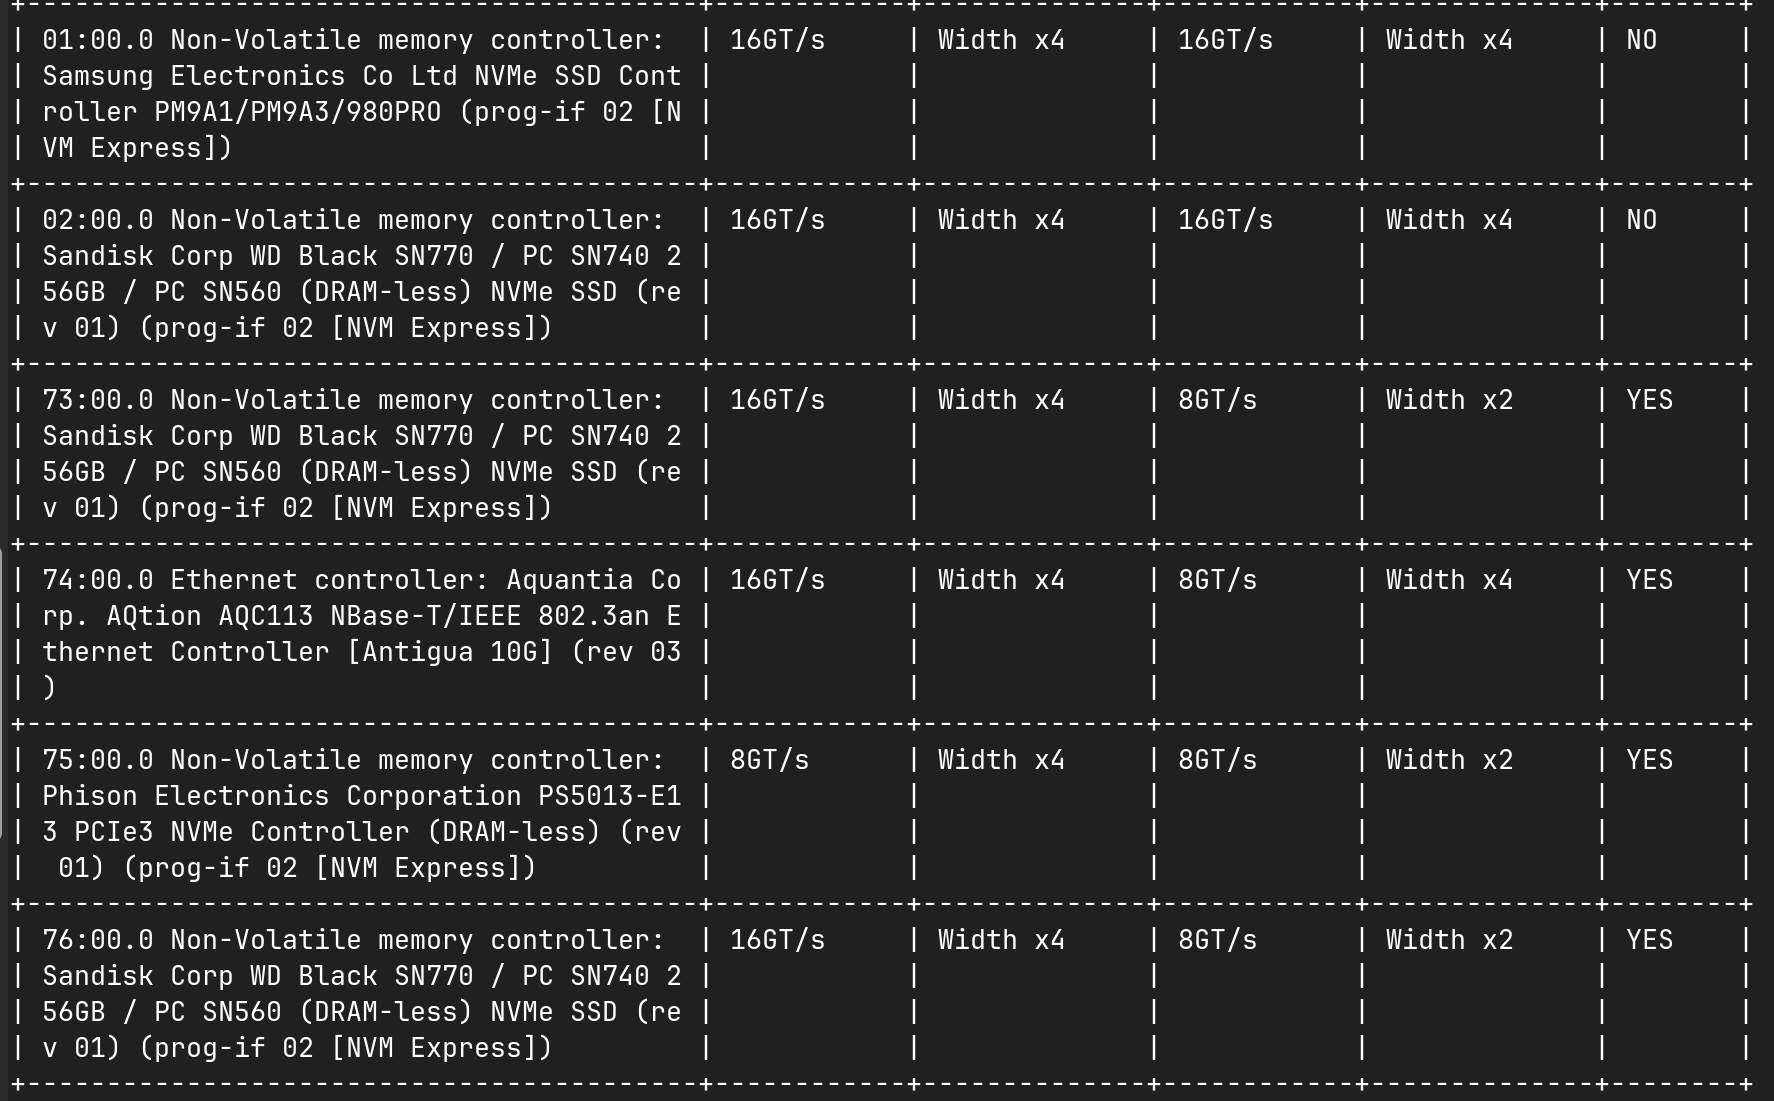
Ich hab die vorinstallierte Ugreen m.2 2242 mit UGOS durch eine Kingston 2230 ersetzt. Die WLAN Karte A+E-Key (die ich nicht brauche) habe ich mit einen Adapter auf M-Key ersetzt und eine Crucial 2TB eingebaut. Die restlichen 4 m.2 Ports habe ich mit 4x WD Black SN850X bestückt.
Was mir aufgefallen ist und ich mir noch nicht ganz erklären kann, ist ein Downgrade bei der Anbindung von zwei der vier SN850X m.2 SSDs.
Ich hab ein kleines Script erstell mit lspci -vv, welches eine Tabelle ausgibt, damit es etwas übersichtlicher bei der Ausgabe wird, anbei das Script:
lspci -vv | awk '
BEGIN {
  W1=40; W2=10; W3=12; W4=10; W5=12; W6=6
  fmt="| %-"W1"s | %-"W2"s | %-"W3"s | %-"W4"s | %-"W5"s | %-"W6"s |"
}
function repeat(ch,n, s,i){s=""; for(i=0;i<n;i++) s=s ch; return s}
function border(){ print "+"repeat("-",W1+2)"+"repeat("-",W2+2)"+"repeat("-",W3+2)"+"repeat("-",W4+2)"+"repeat("-",W5+2)"+"repeat("-",W6+2)"+" }
function row(a,b,c,d,e,f){ printf fmt"\n", a,b,c,d,e,f }

# sammeln
/^[0-9a-f:.]+/ { dev=$0 }
/LnkCap:/ {
  cap_speed=""; cap_width=""
  if (match($0,/Speed [0-9]+GT\/s/)) cap_speed=substr($0,RSTART+6,RLENGTH-6)
  if (match($0,/Width x[0-9]+/)) cap_width=substr($0,RSTART,RLENGTH)
}
/LnkSta:/ {
  sta_speed=""; sta_width=""
  if (match($0,/Speed [0-9]+GT\/s/)) sta_speed=substr($0,RSTART+6,RLENGTH-6)
  if (match($0,/Width x[0-9]+/)) sta_width=substr($0,RSTART,RLENGTH)
  down=(sta_speed!=cap_speed||sta_width!=cap_width)?"YES":"NO"
  n++; devs[n]=dev; caps[n]=cap_speed; capw[n]=cap_width; stas[n]=sta_speed; staw[n]=sta_width; downs[n]=down
}

END {
  border()
  row("Gerät","Cap-Spd","Cap-Wid","Sta-Spd","Sta-Wid","Down")
  border()
  for(i=1;i<=n;i++){
    # Gerät in W1-Chunkes zerlegen
    len=length(devs[i]); pos=1; first=1
    while(pos<=len){
      chunk=substr(devs[i], pos, W1)
      if(first){
        row(chunk, caps[i], capw[i], stas[i], staw[i], downs[i])
        first=0
      } else {
        row(chunk, "", "", "", "", "")
      }
      pos += W1
    }
    # falls Gerät leer (sicherheitsfall)
    if(len==0) row("", caps[i], capw[i], stas[i], staw[i], downs[i])
    border()
  }
}
'
eine Ausgabe in eine Datei kann man noch erzeugen, wenn man die letzte Zeile durch ’ > pcie_info.txt ersetzt.
Ich habe mal meine Ausgabe angehangen, den Unterschied beim Downgrade kann ich mir noch nicht so recht erklären:
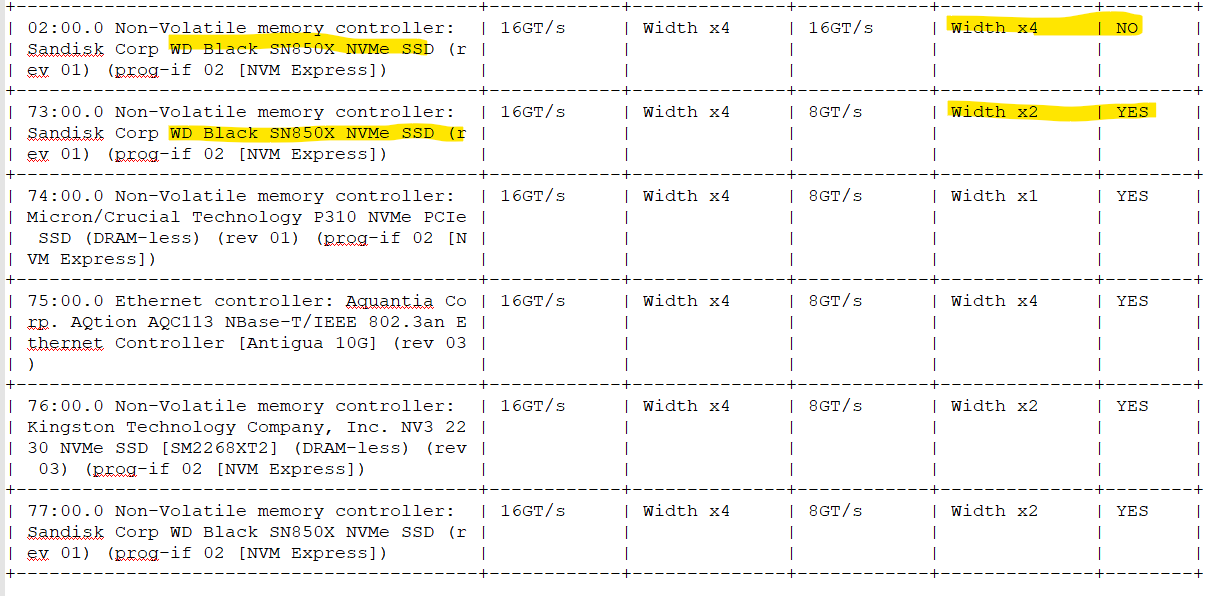
vielleicht hat jemand eine Idee…
Viele Grüße
Roger